Episode 11.3
Page Hits:
2375
|
|
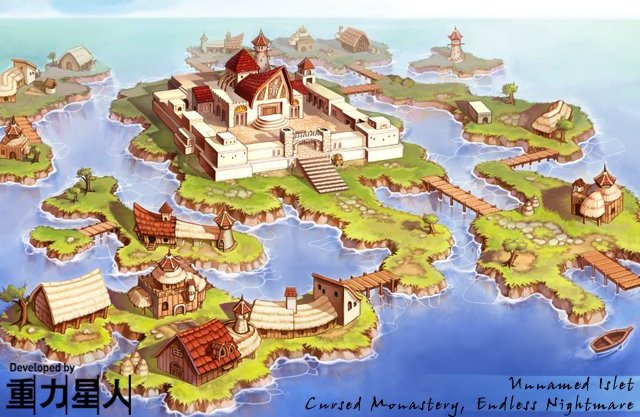
Nameless Island & Cursed Monastery |
|
|
Introduction
Long ago, on a small island inaccessable from land, buildings were constructed, and a small village and monastery were built. It was a beautiful village, sealed away from the world. Never on any map, never given any name.
Slowly people came to know of this nameless island, and they began to come to the island to flee the hardships and illnesses of the mainland. The village expanded, and people devoted themselves to prayer at the great Monastery.
Unfortunately as time passed the island became dangerous as people with sinful hearts came to the island. The spirit of the village faltered, and the light of the sun seemingly could no longer reach the island. While by day the island still appears to be a beautiful land, when the sun sets island changes and the shadows are set free.
Table of Contents
Accessing the Island
The nameless island is one of the final quests dealing with the war between the Arunafeltz and Rune Midgard. As such, several prerequisite quests exist, as well as a special quest to gain access to the island.
Prerequisites: Curse of Gaebolg, Lost Child Quest, Rachel Sanctuary Quest, Veins Sibbling Quest, Thor Volcano Base
The entrance quest to gain access to the nameless island is outlined within the quest section. Nameless Island Quest.
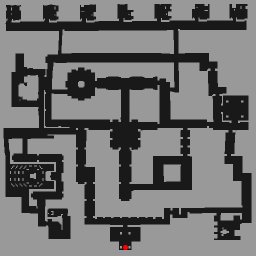
Spawn Information
|
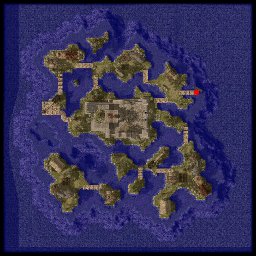
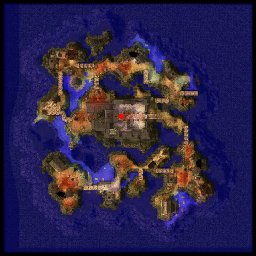
| Map Name: | Nameless Island |
| Map ID: | nameless_i |
| Teleportation: | Possible |
| Memo: | Not Allowed |
| BGM Track: | 111.mp3 - "Good Morning" |
| Camera: | Free |
| Description: |
A small island village off the south coast of the Arunafeltz peninsula. At first glance this may seem like a beautiful island village, but you can't shake the feeling that something is amiss.
This map holds no agressive monsters.
|
|
|
| Map Name: | Nameless Island |
| Map ID: | nameless_n |
| Teleportation: | Possible |
| Memo: | Not Allowed |
| BGM Track: | 112.mp3 - "Good Night" |
| Camera: | Free |
| Description: |
Once nighttime falls on the nameless island, the island shows its true colors. A wide variety of demon and undead monsters wander the surface of the nameless island. Though dangerous, it's nothing compared to what's inside the great monastery at the center of the map.
|
|
| Monster |
Num |
Spawn |
Race |
Element |
HP |
Base |
Job |
PHit |
PDodge |
Agro |
| Ghoul | 40 | 30s | Undead [Medium] | Undead 2 | 5,418 | 1,088 | 622 | 80 | 160 | Yes |
| Hellhound | 17 | 15s | Demon [Small] | Shadow 1 | 9,000 | 4,000 | 3,000 | 117 | 185 | Yes |
| Banshee | 16 | 15s | Demon [Medium] | Shadow 2 | 35,111 | 17,000 | 12,000 | 175 | 231 | Yes |
| Ragged Zombie | 12 | 15s | Undead [Medium] | Undead 3 | 25,000 | 8,500 | 5,500 | 172 | 251 | Yes |
| Zombie Slaughter | 12 | 15s | Undead [Medium] | Undead 3 | 43,000 | 12,000 | 8,500 | 127 | 227 | Yes |
| Flame Skull | 3 | 30s | Demon [Small] | Ghost 3 | 10,080 | 3,000 | 2,600 | 180 | 275 | Yes |
|
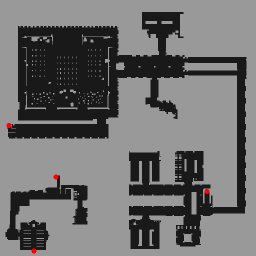
| Map Name: | Cursed Monastery |
| Map ID: | abbey01 |
| Teleportation: | Possible |
| Memo: | Not Allowed |
| BGM Track: | 113.mp3 - "Monastery In Disguise" |
| Camera: | Fixed Camera |
| Description: |
Behind the altar of the Monastery is a great vineyard and wine cellar. The fearsome banshee is the most common monster here, making this particular map difficult for magic using classes but popular for duo'ing melee class parties. Between the high spawn of banshee's and decent numbers of ragged zombies, this map is considered the best place in the monastery to hunt for rare items.
|
|
| Monster |
Num |
Spawn |
Race |
Element |
HP |
Base |
Job |
PHit |
PDodge |
Agro |
| Banshee | 93 | Instant | Demon [Medium] | Shadow 2 | 35,111 | 17,000 | 12,000 | 175 | 231 | Yes |
| Ghoul | 46 | Instant | Undead [Medium] | Undead 2 | 5,418 | 1,088 | 622 | 80 | 160 | Yes |
| Zombie Slaughter | 45 | Instant | Undead [Medium] | Undead 3 | 43,000 | 12,000 | 8,500 | 127 | 227 | Yes |
| Ragged Zombie | 33 | Instant | Undead [Medium] | Undead 3 | 25,000 | 8,500 | 5,500 | 172 | 251 | Yes |
| Hellhound | 25 | Instant | Demon [Small] | Shadow 1 | 9,000 | 4,000 | 3,000 | 117 | 185 | Yes |
| Flame Skull | 21 | Instant | Demon [Small] | Ghost 3 | 10,080 | 3,000 | 2,600 | 180 | 275 | Yes |

|
| Map Name: | Cursed Monastery |
| Map ID: | abbey02 |
| Teleportation: | Possible |
| Memo: | Not Allowed |
| BGM Track: | 113.mp3 - "Monastery In Disguise" |
| Camera: | Fixed Camera |
| Description: |
2F of the Monastery consists of living quarters for the priests and workers who once used to occupy the monastery. The guards who used to work here now exist as the Zombie Slaughters.
This floor is the mobbiest map of the nameless island. The map is swarming with Zombie Slaughters, a total of 210 of them to be exact. The map consists solely of undead monsters, making it prime leveling grounds for TU, Grand Cross, and Magnus Exorcismus builds. The powerful necromancer's spawn here but not in any great numbers.
In the bottom right room, is the quarters of the Hibram, who spawns as an MVP boss every 2 hours. Be warned, this room is also important for a quest, so be careful while doing the quest.
|
|
| Monster |
Num |
Spawn |
Race |
Element |
HP |
Base |
Job |
PHit |
PDodge |
Agro |
| Zombie Slaughter | 30 | 6s | Undead [Medium] | Undead 3 | 43,000 | 12,000 | 8,500 | 127 | 227 | Yes |
| 60 | 1.0m (60s) |
| 30 | 1.1m (63s) |
| 30 | 2.0m (120s) |
| 30 | 2.0m (122s) |
| 30 | 2.1m (124s) |
| Ragged Zombie | 70 | Instant | Undead [Medium] | Undead 3 | 25,000 | 8,500 | 5,500 | 172 | 251 | Yes |
| Flame Skull | 21 | Instant | Demon [Small] | Ghost 3 | 10,080 | 3,000 | 2,600 | 180 | 275 | Yes |
| Necromancer | 7 | Instant | Undead [Medium] | Undead 4 | 98,000 | 45,000 | 35,000 | 158 | 328 | Yes |
| Fallen Bishop | 1 | 2h (7200s) | Demon [Medium] | Shadow 2 | 3,333,333 | 1,111,111 | 1,111,111 | 180 | 275 | Yes |
|
| Map Name: | Cursed Monastery |
| Map ID: | abbey03 |
| Teleportation: | Possible |
| Memo: | Not Allowed |
| BGM Track: | 113.mp3 - "Monastery In Disguise" |
| Camera: | Fixed Camera |
| Description: |
The deepest and most dangerous part of the Monatery, the catacombs. The powerful necromancers, bane of melee and physical attacking characters appear in great numbers here, balanced by a good helping of banshee.
In the top right prison cell, is the where you will find the colapsed man and battle the Dead King as part of the Nameless Island quest. The puppet-master Beelzebub makes his appearance here every 12 hours after he's been defeated. If you plan on leveling here, it would be best to know where Beelzebub is and avoid him because even the best parties can be run down by his approach.
|
|
| Monster |
Num |
Spawn |
Race |
Element |
HP |
Base |
Job |
PHit |
PDodge |
Agro |
| Necromancer | 60 | Instant | Undead [Medium] | Undead 4 | 98,000 | 45,000 | 35,000 | 158 | 328 | Yes |
| Banshee | 30 | Instant | Demon [Medium] | Shadow 2 | 35,111 | 17,000 | 12,000 | 175 | 231 | Yes |
| Flame Skull | 25 | Instant | Demon [Small] | Ghost 3 | 10,080 | 3,000 | 2,600 | 158 | 328 | Yes |
| Beelzebub (Fly Form) | 1 | 12h (43,200s) | Demon [Small] | Ghost 4 | 6,666,666 | 0 | 0 | 228 | 293 | Yes |
| Beelzebub (True Form) | Special | Special | Demon [Large] | Ghost 4 | 6,666,666 | 6,666,666 | 6,666,666 | 228 | 339 | Yes |
| Dead King | Quest | Quest | Undead [Medium] | Undead 4 | 43,000 | 1 | 1 | 110 | 225 | Yes |
Monster Information
| Flame Skull |
 |
60 |
 Skull (50.00%) Skull (50.00%)
 Black Leather Boots (0.20%) Black Leather Boots (0.20%)
 Lever Action Rifle [2] (0.20%) Lever Action Rifle [2] (0.20%)
 Horrendous Mouth (60.00%) Horrendous Mouth (60.00%)
|
Blood Drain
Snap
Fire Ball
|
Demon |
Ghost 3 |
Small |
10,080 |
3,000 |
2,600 |
100 ~ 1,200 |
20 + 30 |
40 + 55 |
Normal |
Average |
180 |
275 |
| Description |
A monster that tries to sneak up on you by snapping closer. While they have a very high flee requirement, low attack power and a lack of dangerous skills means they aren't much of a threat.
They are the only regular ghost property monster in Nameless Abbey, so some form of elemental attack is required. When killed they make a sound that is similar to the monster skill "Dragon Fear".
|
| |
| Hellhound |
 |
71 |
 Monster's Feed (50.00%) Monster's Feed (50.00%)
 Tooth Blade [1] (0.10%) Tooth Blade [1] (0.10%)
 Wild Beast Claw [1] (0.10%) Wild Beast Claw [1] (0.10%)
 Skel-Bone (45.00%) Skel-Bone (45.00%)
 Well-Dried Bone (0.20%) Well-Dried Bone (0.20%)
 Animal Skin (55.00%) Animal Skin (55.00%)
 Pet Food (4.00%) Pet Food (4.00%)
|
Sonic Blow
Heal
Run
|
Demon |
Shadow 1 |
Small |
9,000 |
4,000 |
3,000 |
400 ~ 600 |
35 + 14 |
20 + 12 |
Fast |
Average |
117 |
185 |
| Description |
A ghastly poodle. The Hellhound has the lowest flee requirements of all the monsters on the nameless island. It also drops a series of items that are desirable for an Assassin type character.
When the Hellhound becomes weakened, it will attempt to run away, using the '/hlp' emote. If it runs out of range, it will start to heal itself. While this is fine for ranged characters, it makes them difficult to take down on melee characters if they can't be killed before they start running.
|
| |
| Ragged Zombie |
 |
75 |
 Clattering Skull (30.00%) Clattering Skull (30.00%)
 Tidal Shoes [1] (0.15%) Tidal Shoes [1] (0.15%)
 Memento (15.00%) Memento (15.00%)
Skel-Bone (45.00%)
 Expert Ring [1] (0.02%) Expert Ring [1] (0.02%)
 Wateland's Outlaw [2] (0.10%) Wateland's Outlaw [2] (0.10%)
|
Blind Attack
Arrow Shower
Double Strafing
Magical Attack
|
Undead |
Undead 3 |
Medium |
25,000 |
8,500 |
5,500 |
1,200 ~ 1,500 |
25 + 25 |
35 + 22 |
Very Slow |
Very Slow |
172 |
251 |
| Description |
A zombie that likely was once a villager on the nameless island, that attacks by throwing their own bones at you.
Like many ranged monsters in RO, the Ragged Zombie is difficult to hit and to dodge. They will randomly attack any player within their attack range with each attack, so you can't rely on them simply choosing one target. Despite their relatively high attack power, the Ragged Zombie attacks very slowly.
At times the zombie will feel the need to use magical attack. Because their INT is so low however, their attacks will end up only dealing 1's until the skill wears off. Keep in mind that when they use magical attack their attacks can't be dodged, even if it does not do much damage.
The Ragged Zombie drops both the Tidal Shoes and Expert Ring, making its drops some of the most desirable on the nameless island.
|
| |
| Zombie Slaughter |
 |
77 |
Clattering Skull (30.00%)
 Platinum Shotel [1] (0.10%) Platinum Shotel [1] (0.10%)
Memento (15.00%)
 Broken Farming Utensil (30.00%) Broken Farming Utensil (30.00%)
 Sticky Mucus (30.00%) Sticky Mucus (30.00%)
|
Blind Attack
Poison Attack
Combo Attack
Sonic Blow
|
Undead |
Undead 3 |
Medium |
43,000 |
12,000 |
8,500 |
855 ~ 1,655 |
35 + 50 |
45 + 26 |
Slow |
Fast |
127 |
227 |
| Description |
A monster that has the appearance of an undead Rachel guard. They attack you using farm utensils that they carry in their only remaining arm.
The Zombie Slaughter is dangerous in melee combat. It attacks rather fast, can poison you reducing your defense, and can stun or kill you with its surprisingly frequent sonic blows. With high HP and comparatively high defenses, this monster can be considered rather tough. Its weakness is its Undead 3 element, making it vulnerable to TU, Storm Gust, and a variety of other skills.
Of its drops, the only item of real value is the Platinum Shotel, making it rather undesirable if you are hunting rare items. The Clattering Skull that it drops however is great for refining shadow arrows.
|
| |
| Banshee |
 |
81 |
 Old White Cloth (30.00%) Old White Cloth (30.00%)
 Orlean's Gown [1] (0.10%) Orlean's Gown [1] (0.10%)
 Scalpel [3] (0.10%) Scalpel [3] (0.10%)
 Wool Scarf [1] (0.10%) Wool Scarf [1] (0.10%)
Memento (15.00%)
 Brigan (53.35%) Brigan (53.35%)
|
Critical Wounds
Area Curse
Dark Strike
Curse Attack
Vampire's Gift
Evil Land
|
Demon |
Shadow 4 |
Medium |
35,111 |
17,000 |
12,000 |
1,666 ~ 2,609 |
30 + 1 |
55 + 120 |
Normal |
Average |
175 |
231 |
| Description |
A wailing banshee. This monster has a powerful dark strike, and makes liberal use of Critical Wounds which will drop your recovery effectiveness by 40%. They can use an area curse attack that will curse any players close to her, bypassing dark element armor. Her evil land does constant 100 damage for several seconds to players nearby as well, and again cannot be defended against using shadow element armor.
With only one point of VIT, the banshee can be easily silenced. Even silenced however, they still have a high attack power and a quick attack speed, making them still quite dangerous. Stunning attacks are very effective at keeping banshee disabled.
Banshee gives a very high experience for her HP. While she's fairly easy to kill with physical attacks, magic using characters would think the opposite. Her Shadow 4 element and high magic defense make wizards attacks fairly ineffective. Even a Magnus Exorcismus priest would require a high magic attack in order to take down banshees effectively.
Banshee's drops are considered some of the best in the dungeon, making them valuable to kill on nearly any character.
|
| |
| Necromancer (Boss) |
 |
88 |
Clattering Skull (30.00%)
 Lich's Bone Wand [2] (0.20%) Lich's Bone Wand [2] (0.20%)
Skel-Bone (45.00%)
 Mithril Magic Cape [1] (0.10%) Mithril Magic Cape [1] (0.10%)
 Blue Gemstone (1.00%) Blue Gemstone (1.00%)
 Amulet (1.00%) Amulet (1.00%)
 Torn Magic Book (15.00%) Torn Magic Book (15.00%)
|
Stone Skin
Shield Reflect
Fireball
Thunder Storm
Quagmire
Area Curse
Slow Cast
Critical Wounds
Shadow Element Attack
Dark Strike
Change To Undead
Darkness Breath
Dragon Fear
Meteor Storm
Teleport
Call Slaves
Summon Slave
|
Undead |
Undead 4 |
Medium |
98,000 |
45,000 |
35,000 |
3,500 ~ 4,000 |
0 + 1 |
40 + 190 |
Normal |
Very Slow |
158 |
328 |
| Description |
A magic user who controls the undead. The necromancer travels with two Zombie Slaughters that also give experience, giving a very high yield of experience.
While the necromancer has high ATK and MATK, its slow attack speed and low skill levels on magic attacks make it not that dangerous. Their most common and damaging magic is Thunder Storm, which can be reduced with a wind resist potion. A combination of Quagmire and Slow Casting can completely mess up your cast time though, and the reduced recovery from Critical Wounds can also be troublesome. Be warned that without shadow element armor on necromancers can change your element to undead, making it so you cannot be healed.
Upon seeing a player, the Necromancer will always activate Shield Reflect and Stone Skin, making them very difficult to fight without magic. Stone skin doesn't just increase defense, but reduces damage from all attacks including critical attacks and ones that normally bypass defense. Stone Skin increases the damage they take from magical attacks however, making them very vulnerable to attacks such as Storm Gust and Magnus Exorcismus.
Necromancer drops the Lich's Bone Wand, which if upgraded is desired by many character classes.
|
| |
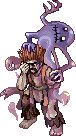
| Dead King |
 |
80 |
 Broken Crown (90.00%) Broken Crown (90.00%)
Sticky Mucus (90.00%)
|
Energy Drain
|
Undead |
Undead 4 |
Medium |
43,000 |
1 |
1 |
1,366 ~ 1,626 |
25 + 10 |
30 + 74 |
Slow |
Very Slow |
110 |
225 |
| Description |
The animated body of a very important man. The Dead King is a quest spawn as part of the Nameless Island Quest. He has no real dangerous attacks, and with shadow element armor on only his regular melee attacks can hit you. If you can kill other monsters on the island, the corpse should be no problem to defeat. Because he is not boss type, it is possible to kill him via turn undead. Be warned that far more dangerous than him is the high spawn of Necromancers in the region where you must fight the corpse.
|
| |
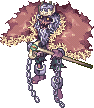
| Fallen Bishop (MVP) |
 |
80 |
 Holy Water (100.00%) Holy Water (100.00%)
 Long Horn [1] (5.00%) Long Horn [1] (5.00%)
 Spiritual Ring (5.00%) Spiritual Ring (5.00%)
 Hunting Spear [1] (5.00%) Hunting Spear [1] (5.00%)
 Elunium (54.32%) Elunium (54.32%)
 Wand of Occult (20.00%) Wand of Occult (20.00%)
|
Dark Strike
Dark Cross
Holy Cross
Grand Darkness
Grand Cross
Vampire's Gift
Slow Cast
Area Curse
Critical Wounds
Evil Land
Magic Mirror
Hell's Judgement
Area Silence
Safety Wall
Pneuma
Lex Aeterna
Critical Slash
Shadow Element Attack
Darkness Breath
Teleport
Call Slaves
Summon Slaves
|
Demon |
Shadow 2 |
Medium |
3,333,333 |
1,111,111 |
1,111,111 |
3,220 ~ 5,040 |
50 + 15 |
0 + 133 |
Normal |
Fast |
180 |
275 |
| Description |
Once a respected high priest of the Arunafeltz, Hibram's blind faith caused him to fall to the evil which he summoned into this world. Hibram appears in his quarters in a room near the bottom right of 2F of the Monastery.
While his physical power isn't strong, with his use of both holy and shadow property attacks and assortment of area attacks, Hibram is a formidable foe. His magic defense is relatively low but with his magic mirror he has a chance to reflect magic damage, posing problems for magic users. He has a sizable mob of banshees which tend to act independently of Hibram. With both Hibram and his banshee's using critical wounds, recovering from his barrage of area skills could be difficult.
|
| |
| Hell Fly (Boss) |
 |
66 |
No Drops
|
Critical Wounds
Blood Drain
Combo Attack
Wind Element Attack
Mental Breaker
|
Insect |
Wind 4 |
Small |
500,000 |
0 |
0 |
1,200 ~ 2,000 |
25 + 60 |
15 + 45 |
Fast |
Fast |
191 |
213 |
| Description |
A monster used exclusively as a slave minion of Beelzebub. In most regards, the Hell Fly is almost the same as a regular hunterfly, just with higher attack power and HP. The hell fly has the ability to drain SP from its target however, and at low chance it can use Critical Wounds Lv 5. Level 5 drops healing effectiveness by a full 100%, meaning the player is unable to recover any HP from the heal or sanctuary skills, and gets no recovery from using potions. Learning how to properly counter critical wounds is key in being able to defeat Beelzebub.
|
| |
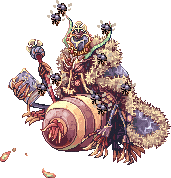
| Beelzebub (Fly Form) (MVP) |
 |
98 |
No Drops
|
Metamorphosis
Shield Breaker
Clashing Spiral
Pulse Strike
Area Sleep
Area Silence
Hell's Judgement
Vampire's Gift
Exile
Agi Up
Heal
Teleport
Pneuma
Call Slaves
Summon Slaves
|
Demon |
Ghost 4 |
Small |
6,666,666* |
0 |
0 |
4,960 ~ 9,060 |
40 + 200 |
40 + 350 |
Very Fast |
Fast |
228 |
339 |
| Description |
A temporary form of the great demon Beelzebub. While he may look like a regular Steel Chonchon, he is accompanied by a group of 7 Hell Flys and several chonchons. He's fast attacking and even faster moving. While he falls well behind Valkyrie Randgris and Ifrit in terms of raw attack power, he makes up for it with a crafty array of status and area effect attacks that can disable and demolish a party. While he has an extremely high amount of VIT, his ghost element prevents him from being hit by skills such as Acid Bomb and Guillotine Fist.
While in fly form, Beelzebub uses Hell's Judgment, Pulse Strike, and area sleep and silence freely. He uses a new skill called Vampire's Gift, which strikes all players on screen for high damage and then absorbs the damage he dealt. At a low chance he can even use Exile on his current target, forcing that target to be teleported away.
Once Beelzebub reaches 50% HP, he will attempt to change forms. When he changes forms his HP will be completely restored, giving him effectively 10m HP. Metamorphosis can be seen by a lengthy cast before he changes. Be warned that if Beelzebub does somehow manage to be killed before he can change to his true form, the fly form gives no MVP, experience or drops.
|
| |
| Beelzebub (True Form) (MVP) |
 |
98 |
Broken Crown (90.00%)
 Variant Shoes (20.00%) Variant Shoes (20.00%)
 Ledger of Death [2] (20.00%) Ledger of Death [2] (20.00%)
 Staff of Destruction [1] (20.00%) Staff of Destruction [1] (20.00%)
 Bison Horn [1] (20.00%) Bison Horn [1] (20.00%)
Elunium (54.32%)
 Chonchon Doll (54.00%) Chonchon Doll (54.00%)
 Beelzebub Card (0.01%) Beelzebub Card (0.01%)
|
Critical Wounds
Shield Breaker
Magic Mirror
Stone Skin
Clashing Spiral
Exile
Slow Cast
Evil Land
Area Petrification
Hell's Judgement
Vampire's Gift
Area Soul Drain
Acid Breath
Magnetic Earth
Heal
Pneuma
Run
Call Slaves
Summon Slaves
|
Demon |
Ghost 4 |
Large |
6,666,666 |
6,666,666 |
6,666,666 |
10,000 ~ 13,410 |
40 + 200 |
40 + 350 |
Very Fast |
Fast |
228 |
339 |
| Description |
The Great "King of the Flys", Beelzebub. In his true form, Beelzebub is considerably more dangerous than he was before. With his higher attack power, Hell's Judgement and the equally dangerous HP draining skill Vampire's Gift become considerably harder to deal with. He gains the ability to drain SP from players, place a magnetic earth on the ground, and even cause casting time of all players to be twice as long with Slow Cast.
When weakened, Beelzebub will lay down an Evil Land, a powerful demonic sanctuary that will heal him but constantly damage all players on screen for 666 unreducable damage. Evil Land will surely blind all players on screen, and he will use area petrification intermittantly as well. Like Hibram, Beelzebub will use Magic Mirror to gain a chance to reflect magical damage. When he is close to death he will activate stone skin to nearly negate all physical damage. If he still cannot win, he will attempt to flee.
|
|
|
|
|
|
|

